How to Make a Video Vertical (9:16) for Shorts, Reels & TikTok
Convert horizontal video to vertical 9:16 for Shorts, Reels and TikTok — three methods compared, plus safe-zone specs for every platform.
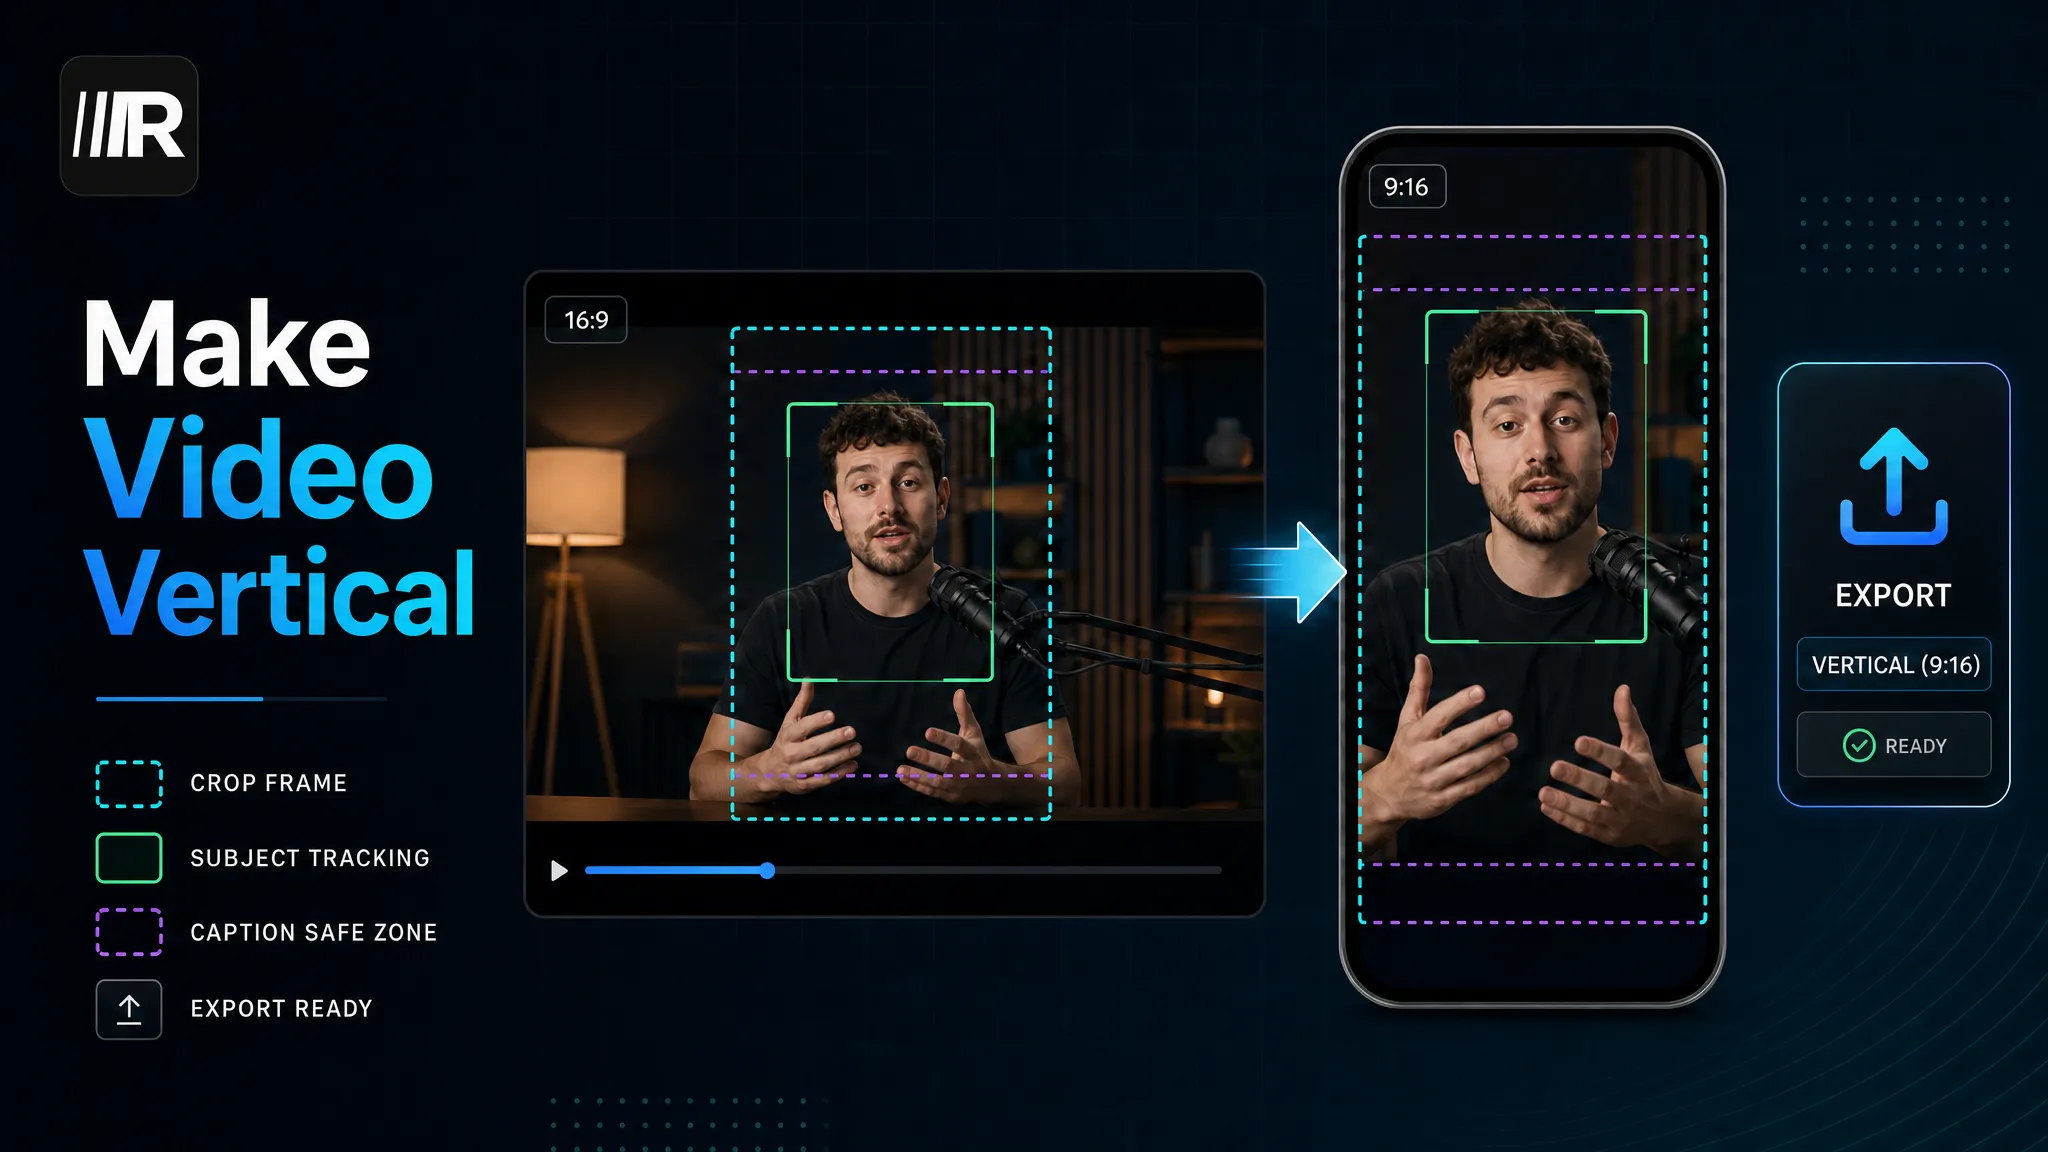
There are three ways to make a horizontal video vertical: crop it, reframe it with subject tracking, or pad it with a blurred background. For most creator content — talking heads, interviews, tutorials — subject-tracking reframing gives the most native-looking result, and the target spec is the same everywhere: 9:16 at 1080×1920 for YouTube Shorts, Instagram Reels and TikTok alike. This guide compares the three methods honestly, lists the safe-zone rules per platform, and covers the mistakes that make a converted video look converted.
The three methods, compared honestly
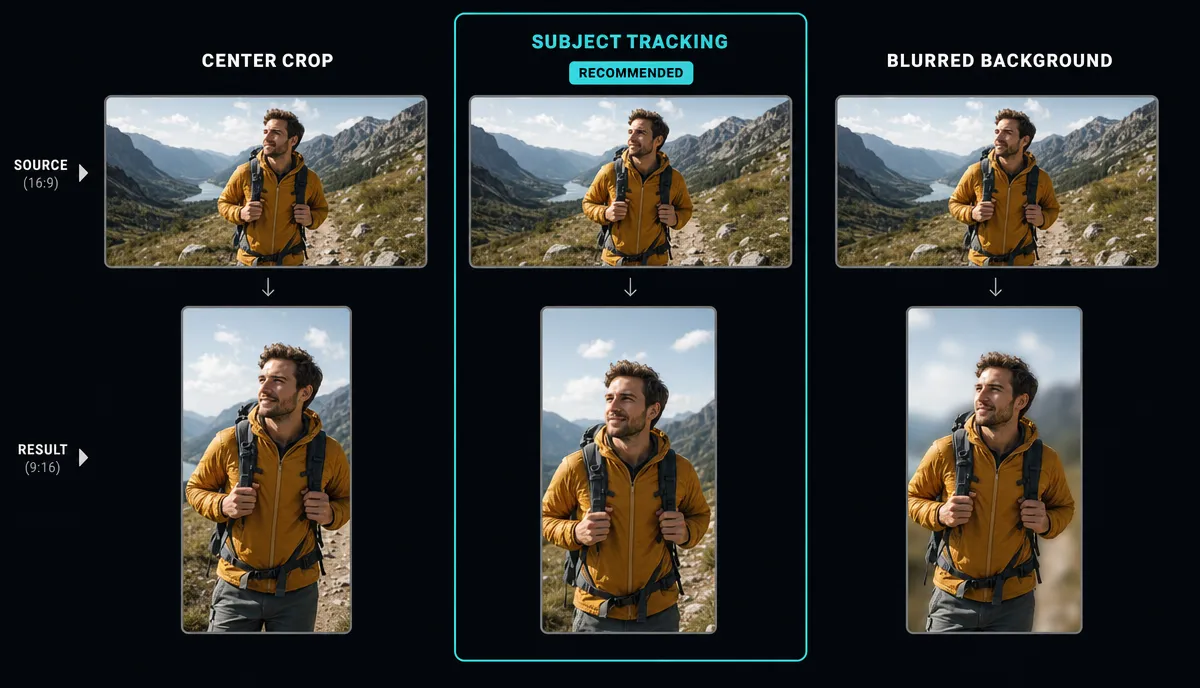
Method 1: Center or manual crop
Cut a 9:16 window out of the 16:9 frame. The geometry is brutal: at the same height, the vertical window keeps roughly a third of the original width. Everything else is gone.
- Works when the subject is centered and static — a tripod talking head, a locked-off product shot.
- Breaks when anything important lives at the sides. Second speakers, slides and on-screen demos all get amputated.
- Cost: near zero for a clip where the center crop happens to work; manual per-shot cropping gets painful past a handful of clips.
Method 2: Subject-tracking reframe
The 9:16 window moves to follow the subject, shot by shot. This is what "smart reframe" features do, and it is the right default for people on camera: presenters who move, walking shots, podcast setups where the active speaker changes sides.
The honest limitation: with two people in frame at once, the tracker has to pick one, and it has no opinion about what matters in b-roll. Plan to review scene changes rather than trusting the output blind.
Method 3: Blurred-background pillarbox
Place the full 16:9 frame in the middle of a 9:16 canvas and fill the space above and below with a blurred, zoomed copy of the footage. Nothing gets cropped.
- Works when the whole frame matters — gameplay, screen demos, wide action, two-person framing you cannot split.
- The trade-off: it reads as repurposed content. The actual video occupies a horizontal strip, faces are smaller, and any text inside that strip shrinks with it. Viewers scroll past "less native" quickly.
Quick chooser: a person talking → Method 2. The sides of the frame carry information → Method 3. A locked-off, centered shot → Method 1, because it is free.
Platform specs and safe zones
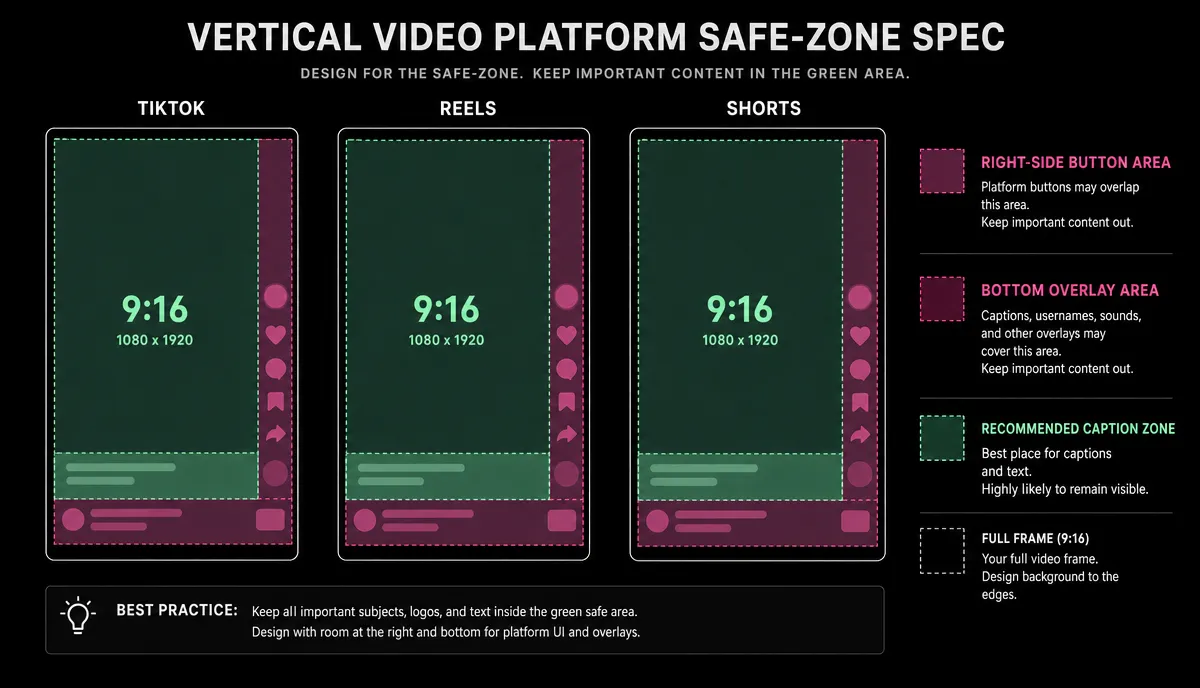
The canvas is identical across platforms; the UI drawn on top of it is not.
| Platform Spec Safe-zone concern | ||
| TikTok | 9:16, 1080×1920 | Right-side button column (like, comment, share) plus the caption and description block at the bottom left |
| Instagram Reels | 9:16, 1080×1920 | Bottom strip: account name, audio row and caption — the lowest part of the frame is always covered |
| YouTube Shorts | 9:16, 1080×1920 | Right-side action buttons and the title/channel overlay along the bottom |
Exact overlay sizes shift with app updates, so do not memorize pixel values. The practical rule: keep faces, product shots and any text that must be read out of the bottom quarter of the frame and away from the right edge. Compose for the strictest case once, and the same master file works on all three platforms.
Step-by-step: the subject-tracking route
- Upload the horizontal source. Recapo is browser-based and takes MP4, MOV and other common formats, up to 6GB per task.
- Set the output to 9:16. If the clip is destined for one platform, start from that platform's tool — the TikTok video resizer or the Instagram Reels resizer — so the ratio and export settings match the destination from the start.
- Run the automatic reframe, then watch the result once at full speed. Note where the crop window jumps, lags or picks the wrong subject.
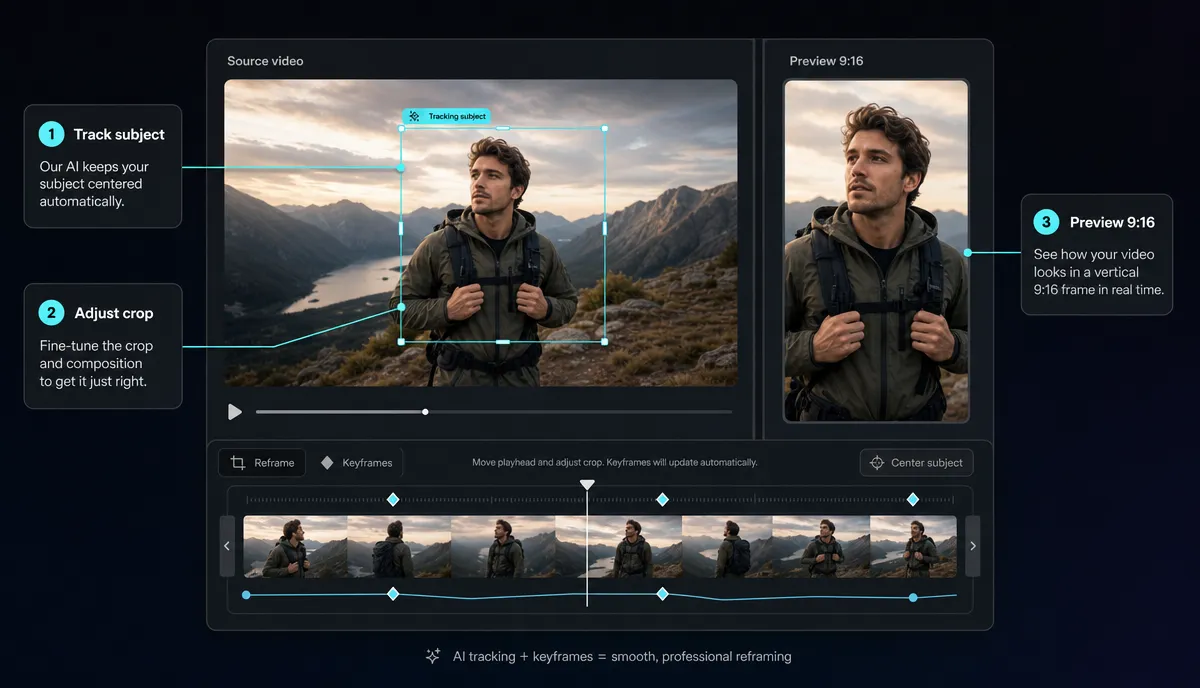
- Fix the failures. Reposition the frame manually where tracking chose the wrong person; for shots where the sides carry information, fall back to the pillarbox method for that shot instead.
- Move captions and overlays into the safe zone — bottom quarter clear, right edge clear.
- Export and check the file itself, not the preview: the output should be 1080×1920. If it reads 1920×1080, you have letterboxed horizontal video, not vertical video.
Batch converting multiple clips
Converting ten clips one at a time means repeating the setup nine times. Do it in one session instead: same ratio, same caption style, same safe-zone rules for every clip, so the only per-clip work left is checking the tracking. If the sources arrive in mixed containers or codecs, normalize them through a video format converter first so every clip behaves identically at export.
Batch conversion pairs naturally with batch clipping. If you are cutting those clips out of one long video first, that workflow is covered in how to make YouTube Shorts from long videos.
Common mistakes
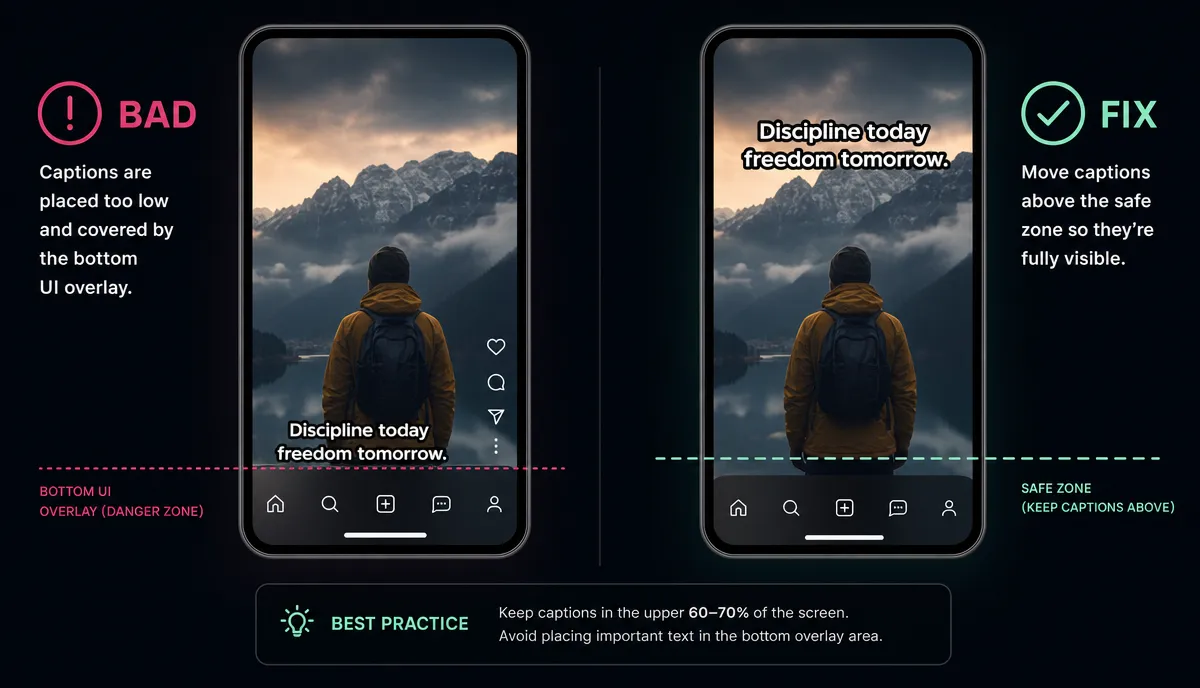
- Captions under the platform UI. The most common failure. Subtitles sit at the very bottom of the frame, look perfect in the editor, then disappear behind the caption block or title overlay in the app. Keep them above the bottom quarter — placement and styling are covered in how to add subtitles to a video.
- Subject half out of frame. A center crop applied to footage where the speaker drifts sideways leaves half a face on screen for entire scenes. If the subject moves at all, use tracking and review the result.
- Fake vertical: 16:9 with black bars. Exporting a horizontal file with the vertical content sandwiched between bars makes the platform treat it as landscape video — it displays small, with dead space everywhere. True 9:16 means the file's pixel dimensions are 1080×1920, taller than wide. Verify before uploading.
- Text sized for a desktop viewer. Overlay text that looked generous at 16:9 on a monitor is now inside a phone-width strip. After converting, check every text element at actual phone size, not zoomed out in the editor.
When converting is the wrong call
Two cases where the honest answer is to not convert at all:
- The information is horizontal. Side-by-side comparisons, wide establishing shots that are the point, dense dashboards. If the meaning lives in the width, every vertical method produces a worse video, not a converted one. Leave those segments to the long-form upload.
- The content was always meant to be vertical. If you know a piece is destined for Shorts, Reels or TikTok, frame for vertical at the shoot: subject centered, gestures kept tight, no critical props at the edges. Conversion is a repurposing tool, not a substitute for planning the shot.
FAQ
What size should a vertical video be for TikTok, Reels and Shorts?
9:16 at 1080×1920 on all three platforms. One master file works everywhere — the real differences are the UI overlays, so compose with the bottom quarter and the right edge clear instead of exporting a separate version per platform.
How do I make a horizontal video vertical without cropping anything?
Use the blurred-background method: the full 16:9 frame centered on a 9:16 canvas with blurred fill above and below. You keep every pixel at the cost of a smaller picture that reads as repurposed. It is the right call for gameplay and screen demos, and the wrong one for a talking head.
Why does my vertical video upload with black bars?
The exported file is almost certainly 16:9 with the vertical image floating inside it, rather than a true 1080×1920 file. Check the pixel dimensions of the export — if the width is larger than the height, re-export at 9:16.
Does auto-reframing work with two people in the shot?
Partially. Tracking keeps one subject framed well, but with two people it has to choose, and it can choose wrong when the active speaker changes. Review multi-person shots and set the framing manually wherever the tracker guesses badly.
Can I upload a horizontal video to Shorts, Reels or TikTok as-is?
The platforms will accept it, but it plays letterboxed inside a vertical feed: a small image with empty space above and below, competing against full-height video. If the clip matters, convert it properly; if the wide framing is the whole point, it probably belongs on your long-form channel instead.
Converting one clip is a chore; converting a batch every week is a pipeline. Recapo runs in the browser: upload horizontal footage (MP4/MOV, up to 6GB per task), reframe to 9:16 with subject tracking, fix the shots that need a human eye, and export true 1080×1920 files with captions already inside the safe zone. Create an account and run your next batch in one session.