How to Burn Subtitles Into a Video (Hardcode Guide)
Burn subtitles into video with free tools or a browser workflow, plus caption styling, platform limits, and SRT master-file tips.

Burning subtitles into a video means permanently baking the caption text onto the picture, so it plays on any device, in any player, with no separate file to load. If you searched for how to burn subtitles into video, you have two honest paths: free desktop tools (HandBrake, VLC, or FFmpeg) if you don't mind a little setup, or a one-click browser workflow if you'd rather skip the install. This guide walks through both, then covers the parts most tutorials quietly skip — which platforms reject a standalone SRT file, how to style captions so they stay readable on a phone, and how to avoid a visible quality drop when you re-encode.
Burned-in captions are also called open captions or hardcoded subtitles. Once they're rendered into the frames, viewers can't turn them off — which is exactly why they're the safest choice for social feeds where autoplay is muted by default.
Key Takeaways
Soft subtitles vs burned-in subtitles: which one you actually need
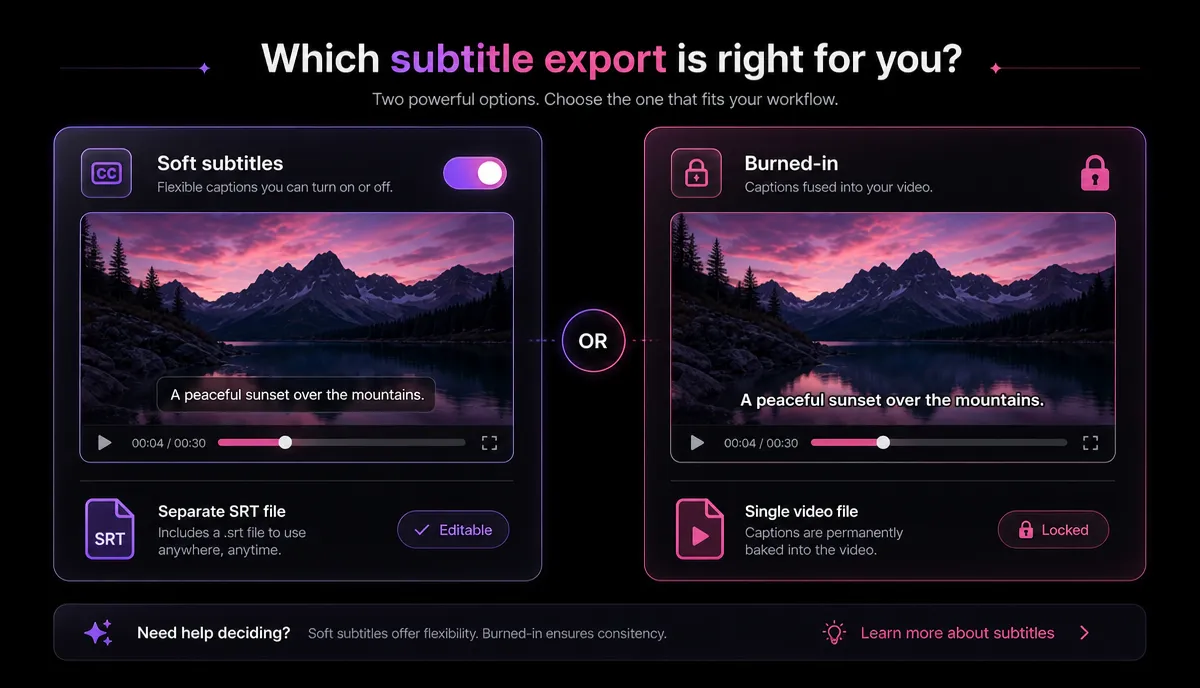
Before you hardcode anything, decide whether you even should. There are two ways to attach text to a video:
| Factor | Soft subtitles | Burned-in (hardcoded) |
|---|---|---|
| Toggle on/off | Yes | No |
| Survives re-upload / re-encode | Depends on platform | Always visible |
| Style control | Limited to player defaults | Full — you choose font, size, position |
| Works on muted autoplay feeds | Only if the platform burns them | Yes, always |
| Editable later | Easy (edit the file) | No — must re-export |
| File to manage | Yes (.srt / .vtt) | None |
Rule of thumb: use soft subtitles for YouTube long-form, web players and courses where accessibility toggles matter; burn in for TikTok, Reels and Shorts where you need a guaranteed, styled look and can't rely on the platform. Many creators do both — burn in for the vertical cut, keep a soft SRT for the horizontal upload.
Before you burn: get a clean, accurate SRT first
Hardcoding locks your text in, so accuracy matters more than usual — a typo you'd fix in ten seconds on a sidecar file now means a full re-export. Start from a solid transcript.
If you don't already have an SRT, generate one with auto-captions, then read it back against the audio and fix names, numbers, and punctuation. Pay special attention to:
- Proper nouns and brand names — auto-transcription guesses these.
- Numbers and units — "$14" vs "fourteen", "5 km" vs "five k".
- Line breaks — split long captions into two short lines instead of one that runs off-screen.
- Timing — make sure each line clears before the next speaker starts.
Keep this corrected SRT as your master file. You'll reuse it for translations, for the soft-subtitle upload, and for any future re-cut — more on that below. For a deeper walkthrough of creating and syncing the file itself, see our guide on how to add subtitles to a video.
How to burn subtitles into a video in the browser (the no-install route)
If you don't want to install anything, a browser workspace is the fastest path. Recapo runs entirely in the browser — no download — and accepts MP4, MOV and other common formats, up to 6GB per task. Here's the flow:
- Upload your video. Drag in the MP4 or MOV you want to caption.
- Add or import captions. Auto-generate them with auto-captions, or import the SRT master you cleaned up earlier.
- Style the text. Open the subtitle style editor to set font, size, outline, background and vertical position. For phone-first video, nudge the caption block above the bottom UI so platform buttons don't cover it.
- Burn them in. Run burn subtitles into video to render the captions permanently into the frame as open captions.
- Reframe if needed. If the source is horizontal and you're posting vertical, resize to 9:16 before or after captioning so the text sits inside the new safe zone.
- Export. Download the finished MP4 with captions baked in.
The browser route trades some low-level control for speed and zero setup. If you caption a lot of clips, or you're turning one long video into several shorts, that saved time adds up quickly.
Free desktop routes: HandBrake, VLC, and FFmpeg compared
Prefer to keep everything local and free? Three well-known desktop tools can hardcode subtitles into video. They sit at different points on the ease-vs-control spectrum:
| Route | Best for | Setup effort | Control | Watch-outs |
|---|---|---|---|---|
| HandBrake | A clean GUI, one file at a time | Low–medium | Medium (uses the subtitle's own styling) | "Burn In" checkbox is easy to miss; re-encodes the whole file |
| VLC | You already have it installed | Low | Low (limited style control) | Convert/Save flow is fiddly and quality settings are opaque |
| FFmpeg | Batch jobs, exact control, scripting | High (command line) | High (fonts, position, encoding all tunable) | Steep syntax; one wrong flag and it silently skips the burn |
A few honest notes on each:
All three re-encode the video, which is the quality caveat we'll come back to. None of them upload your file anywhere — that's their main advantage over any online tool if privacy is your priority.
Which platforms reject a standalone SRT file (the part guides skip)
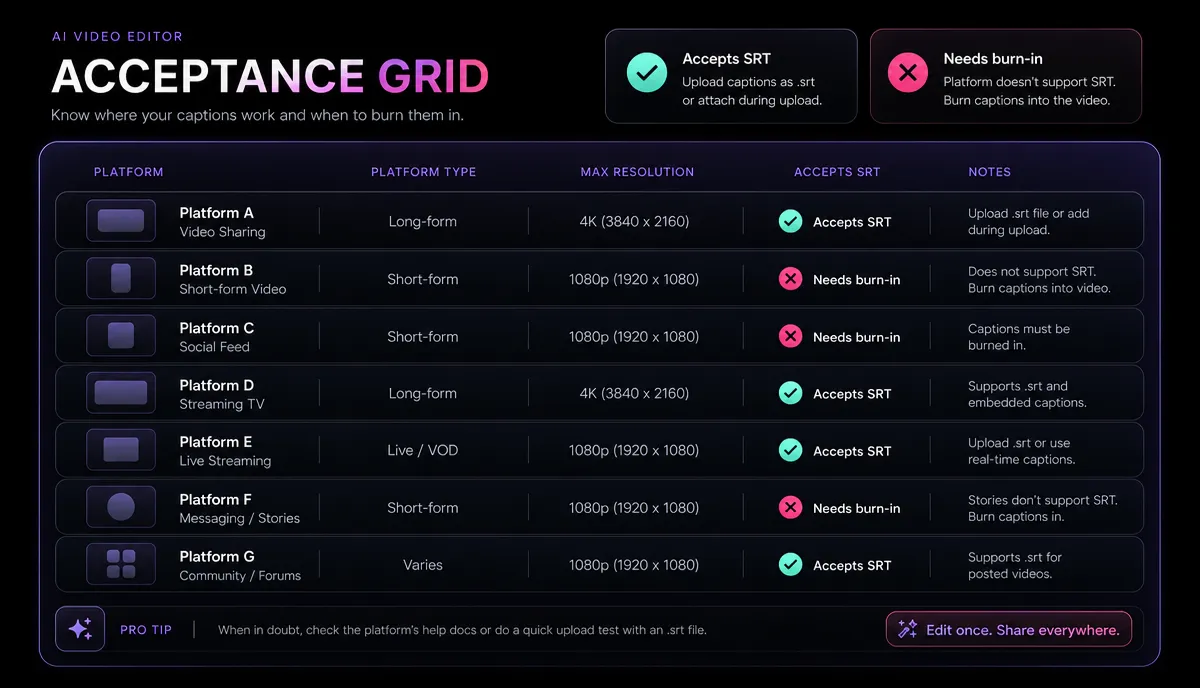
Here's what most "burn in subtitles" tutorials never tell you: some platforms simply don't let you upload a separate SRT sidecar, so burning in isn't optional — it's the only way to guarantee captions appear.
| Platform | Accepts uploaded SRT? | Practical caption route |
|---|---|---|
| YouTube (long-form) | Yes | Soft SRT is fine; burn-in optional for style |
| YouTube Shorts | No sidecar upload | Burn in |
| TikTok | No sidecar upload | Burn in (or platform auto-captions) |
| Instagram Reels | No sidecar upload | Burn in |
| Snapchat | No sidecar upload | Burn in |
YouTube's main player is the exception — you can upload an SRT and let viewers toggle it. On the short-form feeds, there's no field to attach a .srt, and platform auto-captions are inconsistent in styling and accuracy. Burning in your own captions is how you keep control of exactly what viewers read and how it looks. This is the single biggest reason hardcoded subtitles matter for social creators.
Caption styling that stays readable on a phone
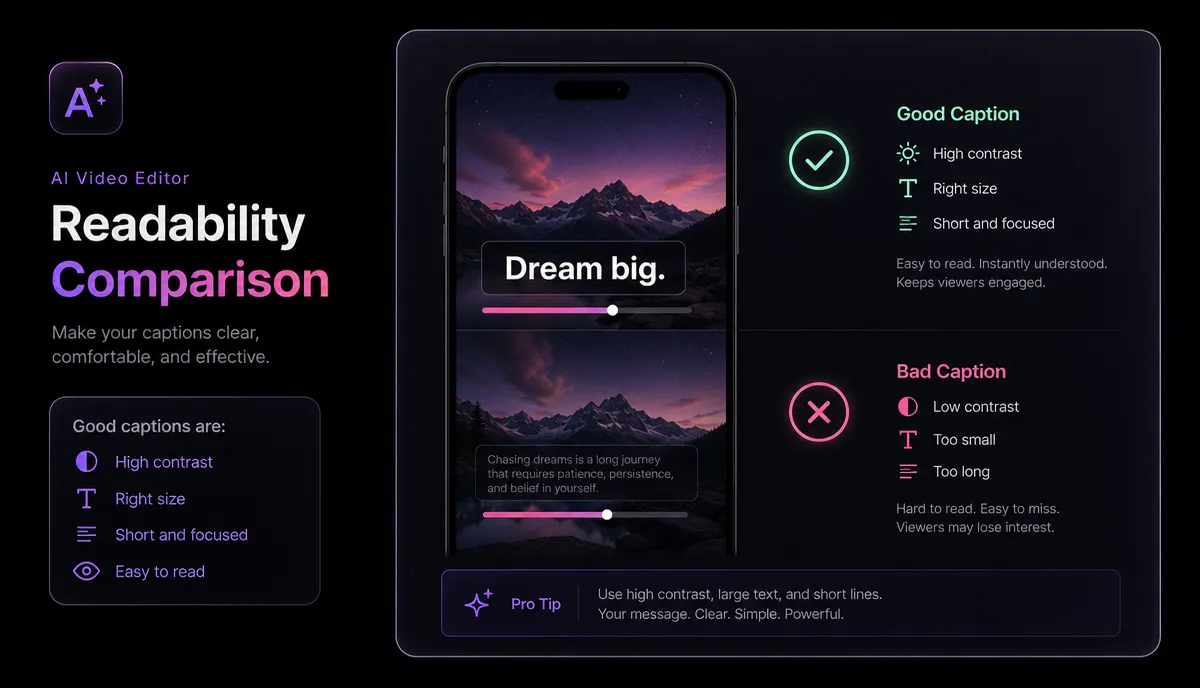
Burned-in text can't be turned off, so bad styling is permanent too. A few practical rules keep captions legible on a small, bright, muted screen:
You can set all of this in the subtitle style editor before burning. If you're reframing horizontal footage to 9:16 for Shorts or Reels, do the reframe alongside captioning so the text lands inside the new safe zone — our guide on how to make a video vertical covers that reframing in detail.
Keep your SRT master, and mind the re-encode
Two habits save you from redoing work.
Always keep the editable SRT. Once captions are burned in, they're pixels — you can't fix a typo, translate them, or restyle them without re-exporting from scratch. Your clean SRT master is the source of truth: reuse it for the soft-subtitle upload on YouTube, feed it to a translator for multi-language versions, and pull it up again whenever you re-cut. Losing it means re-transcribing.
Expect one generation of quality loss. Burning subtitles means re-encoding the whole video, and every re-encode of a lossy format (H.264 MP4) sheds a little quality. To keep it invisible:
- Burn captions once, from the highest-quality source you have — not from a file that's already been compressed and re-uploaded twice.
- Export at a high bitrate so the compression is gentle.
- Do captioning last in your edit, after cuts, color and resizing, so you only re-encode a single time.
Follow that order and a single burn-in pass is visually lossless to a phone viewer. Stack three or four re-encodes and the blocking starts to show.
FAQ
Is burning subtitles the same as hardcoding them? Yes. "Burn in", "hardcode subtitles into video", "open captions" and "burned-in subtitles" all describe the same thing: text rendered permanently into the video's pixels so it can't be toggled off and needs no separate file.
Can I remove subtitles after they're burned in? Not cleanly. Once text is baked into the frames it's part of the picture. You'd have to crop, cover, or heavily process the area — none of which fully restores the original. This is why keeping your source video and SRT master matters.
Will burning in subtitles lower my video quality? It re-encodes the video, so there's a small, usually invisible loss on a single pass at a high bitrate. Quality only becomes noticeable if you re-encode the same footage several times. Burn captions once, from your best source, as the last step.
Do I need to burn subtitles for YouTube? Not for long-form — YouTube lets you upload an SRT that viewers toggle on. For Shorts, TikTok, Reels and Snapchat, there's no sidecar upload, so burning in is the reliable way to guarantee styled captions.
What subtitle file should I start from? An SRT is the most widely compatible starting point. If you also publish to web players or courses that expect WebVTT, keep both formats on hand, since the two serve different players.
Start burning subtitles in
You don't need a desktop install to hardcode captions — clean up your SRT, style it for a phone screen, and burn it in, all in the browser. Create a free Recapo account to caption your first video, keep your editable SRT master, and export a clip that plays with captions on every feed.